Thursday, April 9, 2015

“Wow, you move a lot, you must really know how to get rid of things.”

The typical conversation that happens when people find out how much we actually move:


“Wow, you guys move a lot, you must be great at packing?”

“Yea, I can pack up our entire house in about 2 days.”

“You guys must be really good at getting rid of things and only moving what you need?”

“Not even close, we move plenty of things that we don’t need but we definitely want.”


This same conversation happens almost every single time my husband or I meet someone new and explain how are lives work.

My husband works as an industrial construction project manager, so we move to the project. It makes it easier on his job and on our marriage to be together. Let me tell you, it isn’t always a cake walk for me. The longest we have lived somewhere was 18 months and that was on his first project. The shortest was about 3 months, that we actually spent apart. He was at project, we knew would be short term and it was close enough to our hometown that I lived at home with my parents.

I was thinking about this conversation the last few days, because this most recent move seems to be weighing on me. So, I started thinking back to what makes these new places feel more like home to me.

Whether, we are living in an apartment or house there are a few things I like to do right away to feel more at home. When we bring all of our stuff in, I try to unpack things in a certain order. The bed gets made first, so when we are totally exhausted, we at least have that to fall into, then its the kitchen. The last thing you want to do is try to make a sandwich or find a glass for water among all of your knick-knacks. Plus, it makes it much easier to grocery shop when you know what made the move and what did not. 

Usually, while I unpack the kitchen because I am very specific about where I want things (some may say slightly obsessive); my husband sets up the electronics, TVs, blu-ray players, speakers and whatever else he comes up with to do. Essentially, just trying to stay out of my way.

After the basic things are done, I move on to hanging pictures, setting up the guest bedroom and setting up my space.

Since, we do not have any children besides our fur baby, we have been lucky enough to find houses on the last few moves that allow both of us to have our own little space. My space is, of course, covered in anything and everything pink because it is where I get to keep it. I try not to torture my husband with my love of pink, so this space is where I get to go nuts with it. 

I have my vanity set up in here, my shoes are displayed, well some of them; and it just gives me a place that I can escape for a moment.

This move has been more difficult for me than the last couple have been and I did not think it would be, since we were moving closer to home. Then I realized today, I haven't taken the time to finish setting up all those sentimental things that we move every single time. Part of the reason it is difficult for us to slim down the things we move is because these are the things that make each new house feel like home. 

We haven’t been able to really put roots down anywhere yet, but having pictures of family and friends around make it seem like we are closer to them.

There are certain things that always go in the same rooms, when we move.

This frame collage always goes above the couch, because that's typically where we spend most of our free time.

What you will see on any typical afternoon at our house.


This map usually goes somewhere that we will see it everyday. It was a wedding present from one of our close friends and groomsmen. It is a map of Muncie, IN where my husband and I started dating.

Good Ol' Ball State University. Chirp, Chirp.


There are some pictures I seem to always group together. My sister-in-law made us a picture collage of some photos from our wedding and instead of a guestbook we had a frame that everyone signed. The guestbook frame has a copy of the program from our wedding. One of my close friends created a wedding logo for us, she has a style blog! You should check her out Style Sidekick!!


The frame to the right also gets added to this group. 
It s a Scrabble piece puzzle, a friend gave us at our engagement party.


One of the things, I always put close to the door is this small frame with a Peanuts cartoon in it. My mother-in-law gave us this for our first wedding anniversary. I like to remind myself of this quote when things get hard during this traveling and moving.


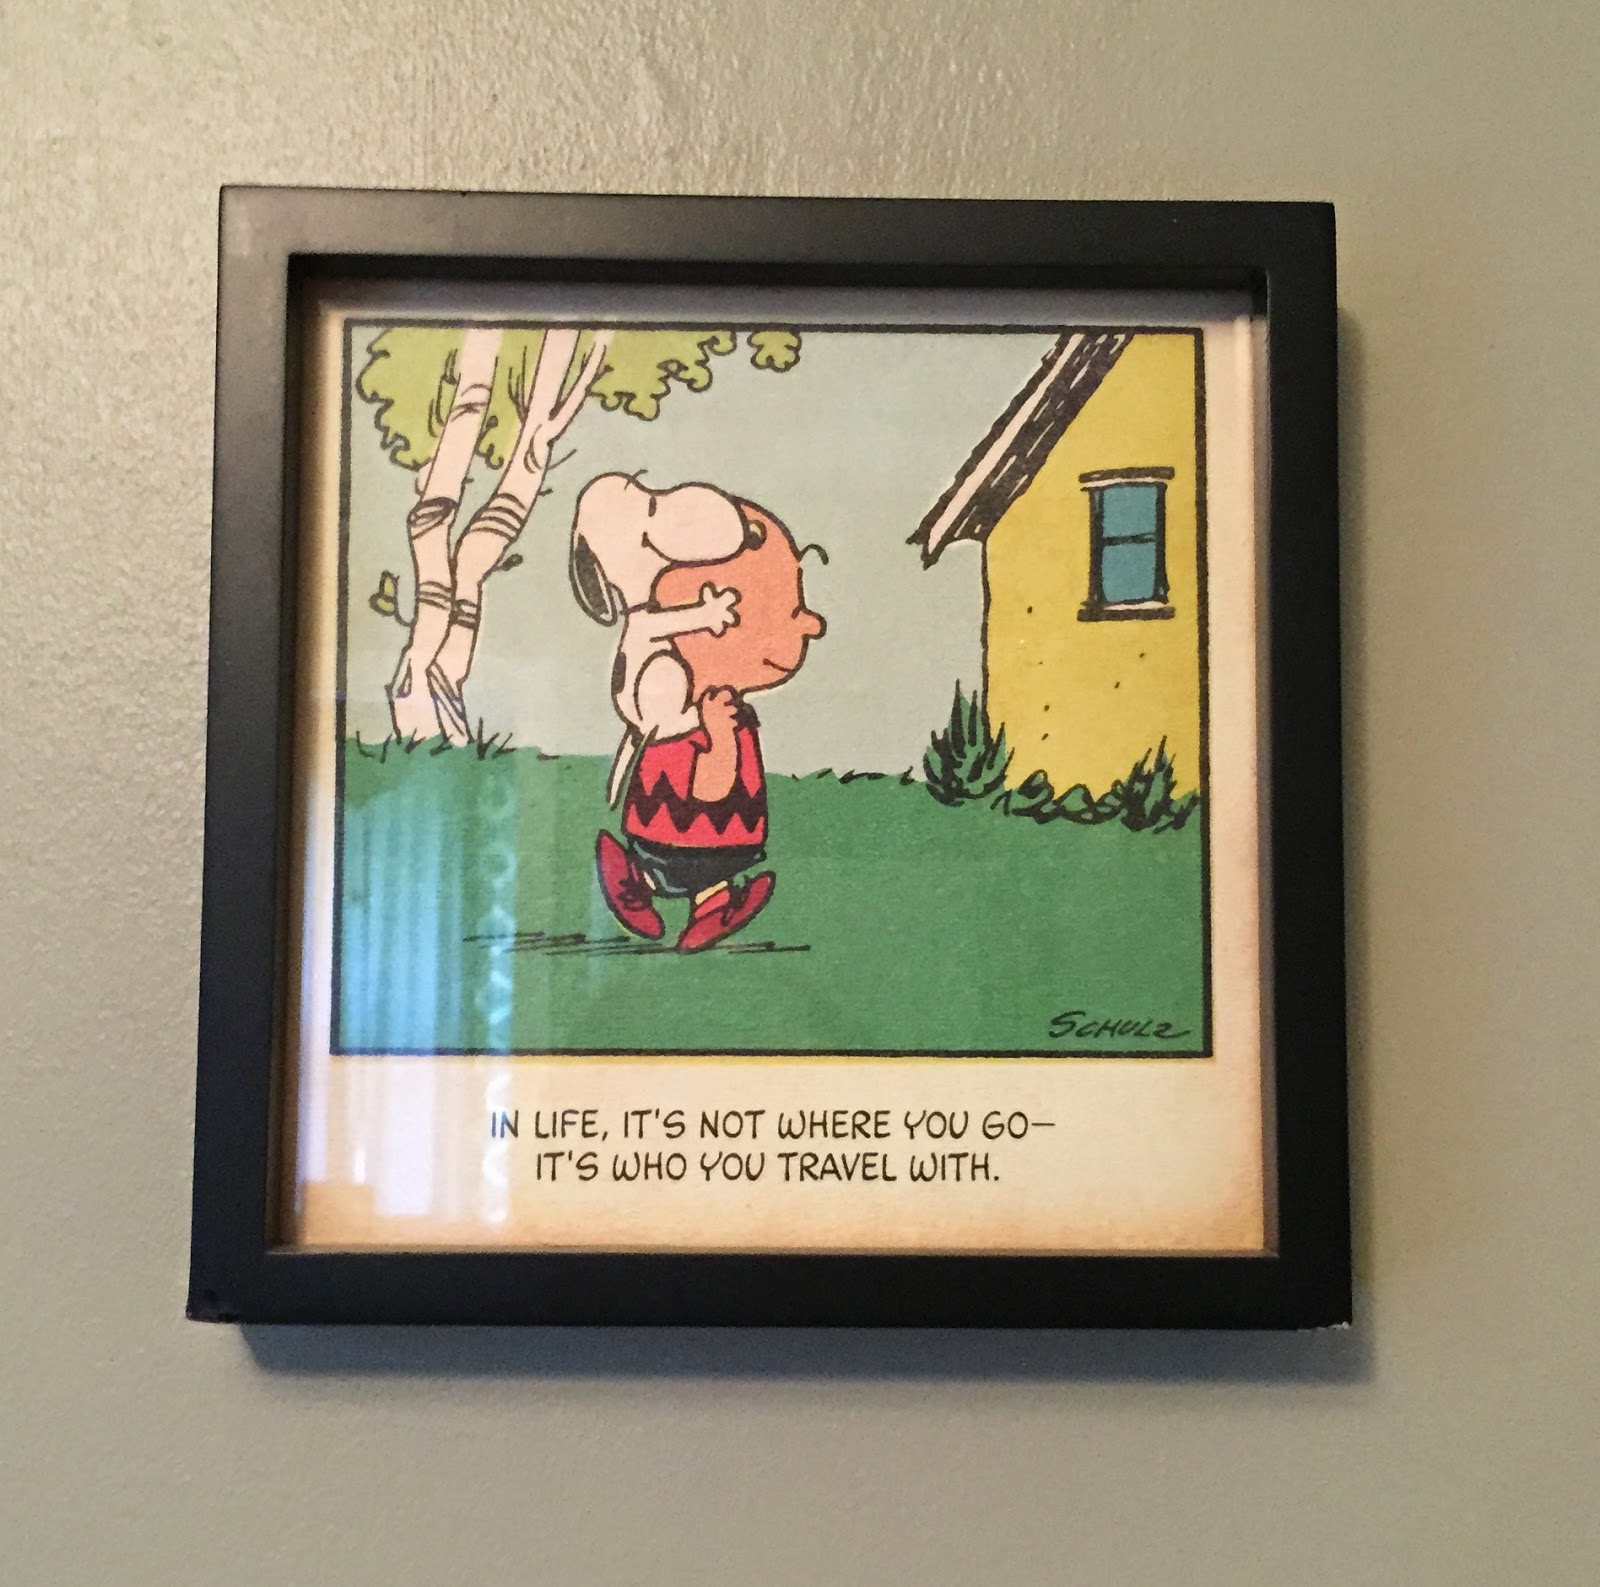
“In life, it’s not where you go - it’s who you travel with.”


Although its hard to live far away from family and friends, not many people can say that have lived so many places over just a few years. 

In this house we remind ourselves its an adventure!


And, the adventure continues….

Tuesday, April 7, 2015

A Hairy Situation! - Shampoo & Conditioner You have to try!!!

Hair can be one of those things that seems better on someone else's head. I got my mother’s stick straight hair, I have a lot of it but it just lays there. My sister and brother got my dad’s curly hair, I dreamed of this hair when I was younger, but have learned to enjoy my straight hair. Especially, in the humidity in the south, no frizz here!

However, while we were living in the dry desert in the southwest last year, my dry skin was going crazy. I felt like nothing was working to help it and this included a new issue of dry, itchy scalp. I was born a blond and a stayed a blond until after I got married 3 years ago. After the wedding, I died my hair black, which only lasted a few months, which made some people happy. Then I settled on this Cherry- cola, burgundy color which I absolutely love, but it doesn't disguise a dry scalp.

Since I have color treated hair, I only wash it a few times a week, your hair doesn’t need to be washed everyday, in fact it can make it worse if you do. Plus the idea of washing my hair, blowing drying and styling it everyday just seems exhausting to me. I noticed last fall, between washes that I was getting some flakiness in my hair. Which, lets be real, that's not cute, so I went on a quest to find a solution. I tried some high end brand shampoos and conditioners and nothing seemed to be working. Finally, I bit the bullet one day at Target and bought Head & Shoulders Dry Scalp Care Shampoo and Conditioner with Almond Oil. I can tell you I couldn’t be happier with the results.


The shampoo and conditioner claim to improve scalp health after 2 weeks of regular use. I can tell that I noticed a difference after the first use. My hair felt so silky and smooth. My dry, itchy, sometimes flaky scalp was gone. Having color treated hair, makes me careful with what products I use. Red hair color tends to rinse out of my hair quickly but I have actually noticed it last longer with using this shampoo and conditioner. My hair even accepted the color better this time than it has in the past. 

I am still only washing my hair 2 or 3 times a week which means some serious dry shampoo and other product build up and it gets everything out. I’m even noticing less dry shampoo use, because my hair feels so soft and smooth. I continue to grab for the Head & Shoulders over my higher end products every time I wash my hair.

My husband, the avid Paul Mitchell Tea Tree Shampoo user, even tried this shampoo and commented on how soft it made his hair! 


I just couldn’t keep this little secret to myself. And its not like you're breaking the bank by giving Head & Shoulders a try. I would definitely suggest if you are having similar problems to give it a try!

The adventure continues....

Friday, April 3, 2015

#Celfie - Fashion Friday!!!

I’m a big fan of playing in my own closet when I get bored but don't want to go shopping or spend money. I spend some of my free time browsing Pinterest for outfit ideas or other fashion blogs and Instagram. But I always try to remember its inspiration, it doesn't have to be a match, unless I have to have something!


Most of the time when I put an outfit together its because there is something I feel like wearing. So I start with that as the base piece and work around it to come up with as many options as I can with stuff I already have.

I mean I had to, look at this shirt!


Now I am all for the fun, spontaneous outfit. I don't mind looking a little bit funky. I got this #Celfie T-shirt last week at Target. I just couldn’t past it up. Plus I have had my eye on these shoes since before we moved. What can I say, its rare for me to find a pair of shoes I don’t like. 


While I love a great outfit with a great pair of heels, I more collect the heels than wear them everyday. So I put together another outfit option that is more wearable for me. I like having a few go-to put together looks that when I feel like I can’t find anything I actually want to wear in my closet, I just grab and go. These boyfriend jeans are the only ones I have found that fit my booty and don't make look ridiculous. I practically live in them, I am always grabbing them for a comfortable outfit.

Plus anytime, I can wear anything that supports my rescue dog I am all for it! 

I also, believe that leopard print is a neutral and can be added to any outfit. A little leopard never hurt anyone.

I don’t know that I could give myself a specific style, I just wear what I like when I like it. I don’t think fashion is about rules, I think its about having fun and making yourself feel great! 


Outfit #1
Top - Target - Link
Jeans - Old Navy Boyfriend Jeans - Link
Belt - The Limited - Link
Shoes - Target - Mossimo - Link
Jewelry - Target - SimilarSimilar


What happens when your husband is the photographer and you tell him he can be artsy.


Outfit #2 (Clothing pieces are the same, just changed up the accessories.)
Shoes - Vans - ASPCA 2014 -New Slip Ons
Scarf - Leopard Infinity - Call it Spring - SimilarSimilar

She is too cute not to get a picture.

We are learning how to take model pictures over here, so hopefully with time we will get better with outfit posts. :)

What are some of your favorite pieces to wear right now?

The adventure continues....

Tuesday, March 31, 2015

My Go-to Face Brushes

So a couple of weeks ago, I was telling my friend what brushes to try because she's just getting into using face brushes for make up. This got me thinking about what brushes I use every time I do my makeup. Eye brushes are pretty interchangeable for me, I haven’t tried any that I’m always grabbing.  Face brushes are a different story, I seem to always use the same ones and they are definitely the first ones I grab to pack when I’m traveling.

Real Techniques brushes, in general, are a brand I gravitate towards. They are reasonably priced and great quality. You can find them at Ulta, Walgreens and Walmart. A lot of the time you can find them at Ulta for Buy one get one 50%, definitely a great deal. 

My go-to face brushes include: concealer, setting, contour, bronzer, and blush.

Concealer - I always use the Up & Up Round Foundation Brush from Target. It caught my eye one day at Target, because it looked similar to a higher end brush I had seen some people using on YouTube. I am more of a budget girl and would try something I can just grab from the store when I see it.


This brush is great for getting right underneath those lower lashes and blending out your concealer. It works great at picking up any extra product, if you have been a little heavy handed. And makes it easy to blend out in that coveted triangle shape for brightening and concealing.

Setting - Depending on what I am setting I use two different brushes. For setting concealer under my eyes I use the Real Techniques Setting Brush. For setting my T-zone or my whole face I use the Coastal Scents Powder Brush.


This Real Techniques Setting Brush is great for getting the right amount product just under the eye to set that concealer and keep it from creasing. Its small enough in size but fluffy enough that it doesn't make under the eye look heavy.

Coastal Scents Powder Brush


I got this Coastal Scents Powder Brush in a set of 22 brushes for Christmas. {Brush Set Linked Below} The dual fiber bristles are perfect for getting enough powder to press into the skin but keeps you from being heavy handed with setting powder.

Contour - This Real Techniques Contour brush is perfect! Its the perfect round size, fits right into that contour hollow under you cheekbones and blends beautifully. It blends contour effortlessly but the size of it keeps it where you want it to be. Its the only brush I use for contouring.


This brush can only be bought in the Real Techniques Core Collection, but I think it is definitely worth it. You get 4 brushes for $17.99. The foundation brush in this collection is also one of my favorites.

Bronzer & Blush - These kind of go hand in hand because I actually use the same brush for both of these. Yes, I have 2 of them, because I bought one when I thought my luggage was lost; then realized how great it was and bought another one. We have a saying about things like this in my family: “If one was is good, two must be better.” I might come from a line of well prepared people.


This brush is the Real Techniques Blush Brush. It has a tulip round shape. Its great for bronzing the whole face because you can blend out bronzer quickly and easily. I love it for blush because I just use the side of it to tap blush on the apples of my cheeks and blend back to the ear.


For foundation, I use a couple different brushes, its either the Real Techniques Expert Face Brush or Buffing Brush. I talked about these previously in my Unexpected Favorite Foundation post . I’m always trying new foundation brushes from Target, Elf, basically anything that looks intriguing, sometimes sponges.

I love highlighting too but have yet to find that brush that I need to use all the time for it!

If you have any go-to brushes, that you think I can’t live without, let me know! I love trying new ones!

The adventure continues….


Wednesday, March 18, 2015

Follow Me!

Follow Me Everywhere!!!

Twitter: ShannasModLife
Instagram: Shannasmodernlife

The adventure continues....

Neverending dog treats...

I have a beautiful furbaby that I love, she's the Bassador ( Basset Hound - Labrador).  Since moving into this new house there seems to be no good places to hide things that you don't want to look at all the time, like the endless bags of dog treats. Did I say she was spoiled? Because she is a spoiled puppy.


Her current position while I type this. She's laying in our room right behind my chair.


Yesterday, I was looking at the dog treats on top of the fridge annoyed by how ugly the pile looked. I went to the store for a few things and was going to look for air tight canisters for the treats. As usual, I made myself a list for the store but didn't actually bother looking at it, while there. Oops, its hereditary to make grocery lists and leave them at home when you actually go to the store. Sadly, the list was on my phone, but still didn't look at it.

Anyway, I was headed home from Tractor Supply because I had to get Missy a new harness for walking. While on the way back, I remembered I forgot to look at canisters, and then the idea of Ball Mason jars popped into my head. I mean, my husband and I are both Ball State Alumni. We drink out of pint size Ball Mason jars. Why have I not thought of this before?!?! Why have I not seen this on Pinterest before?

Well, it could be on Pinterest somewhere, but I do not think I have ever seen it.

I didn't get a before picture of the messy treats, because I was too excited when I got home to do this little project. I also made sure to wash the jars and lids first to make sure they were clean.

I found wide mouth quart size Ball Mason Jars. $10 for a 12 pack, lids included.

This is the side of the box they come in.


The jars seal air tight with the lids on, so it keeps the treats just as fresh as the bag.


Missy's treat jars, now live next to the fridge on a baker's rack. We can see what each treat is, so it is easily accessible.

The treat bag in the back is empty, Plato Natural Duck Treats. We are on the hunt for them, because Tractor Supply doesn't seem to sell them here. Missy is obsessed with them.


The only other thing I thought about doing after the fact was painting a chalkboard square, either on the lid or on the jar to write the name of the treat on it. I might do this later as Missy works her way through the treats.

I didn't put the Milkbone treats in a jar because a box of them would take up a few jars and they take up less space staying in the box.

So now, I have something cute to look at, something memorable for my husband and I, and something that keeps Missy happy!

Maybe more people will want to try this too!


The adventure continues…

Monday, March 9, 2015

New favorite foundation!

Finally back in business with Internet at the new house. (Oh the joys of moving!)

Recently, I was hearing about Maybelline’s New Fit Me Foundation Formulas, which intrigued me. 

A little about my skin, its dry, super dry in the dry desert air (hoping this changes when we get back to a hot humid climate!) and it is sensitive. I try to be careful with what I put on my skin, part of the reason I have been wearing Bare Minerals for so long. Since my skin is so dry, I don't like putting matte finish foundation on it, it usually just accentuates the dryness.

My personal makeup goal, is to try and always have that J. Lo glow! 

Originally, I had heard about the Matte & Poreless Maybelline foundation and didn’t pay much attention to it. Then in one of my many wandering trips to Target, I noticed the Dewy & Smooth Maybelline Fit Me formula. The words dewy and smooth were a seller for me instantly, plus Maybelline Fit Me has a billion shade choices, so even if you are off a little you can make it work. 

I can have between a fair and medium skin tone, depending on the amount of tan I have for that time of the year. I grabbed shade number 125 (Nude Beige) and 130 (Buff Beige). I grabbed the 130 first in Arizona because I couldn’t find 125 anywhere. Then on a recent trip back to the Midwest, my luggage was misplaced on the flight home (only my luck), so I bought some emergency essentials (or that's what I told my husband, wink, wink.) and found 125 at Ulta. Turns out 125 is the better shade for me currently but I think 130 will be perfect as soon as I get a little summer glow going on.

I paid $4.99 at Target and $7.99 at Ulta. I would suggest looking for it at Target or Walmart, I am all about the bargain (most of the time).


Same Formula, Same Ingredients. (Left = Old Packaging, Right = New Packaging)

Shade Number is on the top in the new packaging.


The Dewy & Smooth Foundation, is the same as the original Fit Me foundation. The shade 125 has the original packaging and the 130 shade has the new packaging but the ingredients are the same and they seem to work the same.

I was OBSESSED with this foundation as soon as I put it on my face!!! It does exactly what is says, its dewy and smooth! Its amazing! My aunt even said to me “Your skin looks so smooth!” She didn't even know I had a new foundation on. That made it even better!

It has SPF 18, which is always a plus for me! I like to use a moisturizer and foundation with a SPF, because you only get one skin so keep it healthy. The SPF in any foundation can cause a white-cast in pictures with a flash but I have not noticed any white-cast with this foundation.

I apply any foundation with the Real Techniques Expert Face Brush or Buffing Brush. 

Top = Expert Face Brush, Bottom = Buffing Brush

Shape of Expert Face brush is wider and more dense.

Shape of Buffing Brush is round and a little softer.

The Expert Face Brush adds more coverage than the buffing brush.

I either pour the foundation on the back of my hand and dip my brush into it to apply it. Or I will dot the foundation all over my face and neck and blend it out with the brush. Its difficult to control the amount when pouring it on the back of my hand, but I’m getting better with it.

It definitely has build-able coverage. I would say it has medium coverage with one layer. It covers minor imperfections and blemishes. It also lasts most of the day with just the foundation, but if used with a setting powder and/or setting spray it will last as long as you want it too.

I have only tried the Dewy & Smooth formula since its for Normal to Dry skin, but I did recommend the Matte & Poreless formula to a friend with Combination to Oily skin. She says she likes it but the shade is a little yellow for her skin tone at first but once it settles into the skin the yellowness goes away.

Definitely think its a drugstore foundation to try, no matter what your skin is like. I haven't had any problems with my sensitive skin either!

Pros:
SPF 18
Options for Normal to Dry and Combination to Oily
Many Shades
Build-able Coverage
Price

Cons:
Can be messy when applying it.

No pump to control the amount you get.

Hope my first beauty post was helpful! I have a lot more planned now that I have an Internet connection again!

The adventure continues…